Showing posts with label Android. Show all posts

Wednesday, December 14, 2016

Uber Tracking your location after completing your Ride.


Uber has said that it will track your location for 5 mins after completing your ride.
It claims, it will help in better consumer experience as location is key in it's game.

Till now we do not know how long it has been tracking its users after completing their ride. I did happen to read the wired article, which says how Uber has a "God View" and how it is a source of entertainment at parties :|
Yes, Uber app in the background can also track your location.


To disable the tracking, you will need to disable location permission on ur phone;
for all your apps or Uber specific location permission(Android Marshmallow and above)


Thursday, December 1, 2016

Watchout for Gooligan- Check if you are affected now!

Image result for red android


Gooligan is a malware that affects android os phones particularly V4 &5. This malware was reported first mid of 2016. This malware steals the authentication tokens of your google accounts such as drive, mail etc and installs adwares which inturn generates revenue for the installed apps.

More Details:https://plus.google.com/+AdrianLudwig/posts/GXzJ8vaAFsi

List of Apps installed by Gooligan: http://blog.checkpoint.com/2016/11/30/1-million-google-accounts-breached-gooligan/

Check here if your account is being compromised
https://gooligan.checkpoint.com/

If you find your account is compromised then it would be safe to do a clean install of the OS on your phone, a  factory reset on your phone wont get you that far. Also change passwords immediately of your google accounts. Gooligan does not access user data nor modifies OS/ system files.

Use Google Play Store to download apps and be careful while installing apps from 3rd party websites.

Saturday, July 16, 2016

Tackling "Phone storage full"

When you don't have an extendable memory slot and you thought that 16 gb /less was enough for your needs, you might find yourself in a shock when you get this problem.


Other than the fact that you managed to fill up your phone with data most of which you don't need, you might still be able to create some space by clearing up some of the junk you never use or which is created by your phone.

Below are a few quick ways to free up some space on your android phone. (no root)


Disable apps which you do not use.


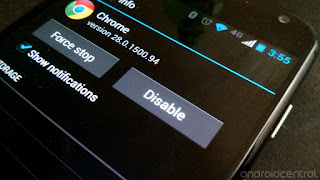
For example, you may not be using google+ . Go to application manager, select the app and force stop it before hitting the disable button.(you can always enable it again) Also before doing this, you can uninstall the updates of such apps that come with the phone. Incase your phone does not come with this app disabling feature, then you would have to install some app of the playstore, such as "disable bloatware" or "app Freeze"

Uninstall apps that you never use.


Apps keep getting heavier after each update, so if you have not being using an app for a long time, you can uninstall it. If you still feel like you may use the app in the near future, back up the apk file using an app like "Ess file Manager" and then uninstall the apps.

Delete Big Files  / duplicated files


Use " Big File Locator " to find the large files in your phone and delete them if they are of no use to you.


Backup your files.


You can use "dropbox "or "box" or any reliable backup service that suits your needs. I use dropbox, it has 2 GB free storage available.(Box has 10gb) You can move your pictures or files to it and clear up the space on your phone.With some settings in such app, you can schedule your uploads or folder that you want to back up at certain intervals.


Misc: Few common tips.


  • You can always root your phone if you want to get rid of the apps, that come bundled in your phone.
  • Turn auto update app feature OFF. You can select the apps that you want to update.
  • Use websites instead of app, wherever possible. (All websites promote their apps, but not all apps are good for you)
  • Do not use apps like clean master or apps with such functionalities, they may do more damage than good.

Sunday, January 17, 2016

One quick way to save battery on android

Install a firewall - mobiwol app 

https://play.google.com/store/apps/details?id=com.netspark.firewall&hl=en

This firewall doesn't need your phone to be rooted.

It has a simple interface. Configure the apps that you want it to access the internet via your data pack or Wifi. Like in the below screenshot.

   Mobiwol: NoRoot Firewall- screenshot

For example you can set an app to access internet only via wifi and not your data pack hence saving you your expensive data pack by a few mbs per app.

On selecting only the apps which you want to access the internet, you are disabling

  • Frequent update checks
  • Frequent version checks etc.


Which inturn reduces the battery usages.

( Explanation: Even if you have an app that you never used, it would still make calls to its servers to check for updates. The frequency of this depends on the app. Once you install this app on checking upon the logs you can find out those apps and block em temporarily )

There are a lot of other basic rules like, 
1. Use wifi less , manage it well, there are apps that can schedule it to run every once in 15 mins or whatever time period you set.
2. turn off GPS when not in use.
3. Uninstall apps that you dont use
4. Charge your phone once it is below 10% not above it. (purchase a portable charger if it would help your cause.)
5. Set Datasaver ON on your Chrome Browser / any other browser that provides the feature
Chrome - Settings - Data Saver - On

I have been using my moto x for some time now. I use mobiwol, you can try other apps in the store. For me this app has reduced my battery drain and saved considerable amount of data usage.


Note:This firewall uses a VPN for more info checkout Android forums.
http://forum.xda-developers.com/showthread.php?t=2790642


Monday, September 1, 2014

Rooting and flashing Sony Xperia J ST26i

Writing this post after successfully flashing Sony Xperia J ST26i with DARK MOON AVD ROM

I followed the instructions given in
http://forum.xda-developers.com/xperia-j-e/development/st26i-dark-moon-avd-rom-4-1-2-v1-6-t2309415

Steps:
PART 1:

Take a backup of your contacts, sd card etc. I used My phone Explorer

Update the phone's firmware
Go to Settings > About phone > Software updates > System updates
or use SONY PC Companion

PART 2:

Unlock BootLoader
Followed the steps given here
http://www.android.gs/unlock-bootloader-sony-xperia-devices-universal-tutorial/

How to Unlock Bootloader of Sony Xperia Devices (official and universal tutorial)
  1. Go here and check whether your smartphone is on the “unlock bootloader” list or not. If your phone is not listed there it means that you cannot use this guide for unlocking the system.
  2. Also, on your handset type and dial: *#*#7378423#*#*; then go to “Service info -> Configuration -> Rooting Status” and check if the “Bootloader unlock allowed” says yes. If the “no” answer will be displayed then you will not be able to unlock the bootloader of your device.
  3. Now, extract the file named “downloadinf.zip” (which has been downloaded before) on your computer.
  4. Then, copy the obtained file (“android_winusb.inf”) to path c:\android-sdk\extras\google\usb_driver.
  5. Click yes if asked to overwrite something.
  6. Type *#06# on your phone and get the IMEI number; write it down as you will need it a little bit later.
  7. Now, go here.
  8. On the first page click on “Yes, I’m sure”.
  9. Agree to Sony’s legal terms and then hit “I accept”.
  10. On the next page enter your name, email and your device’s IMEI number and click on “Submit”.
  11. An unlock code will now be offered; note it down.
  12. Turn off your device and connect the same with the computer by pressing on the Menu button (for the Xperia arc, Xperia arc S, Xperia neo, Xperia neo V, Xperia pro handsets), or on the Search button (for the Xperia Play device) or on the Volume Up button (for the Xperia mini, Xperia mini pro, Xperia ray, Xperia active, Live with Walkman, Xperia S smartphones).
  13. Install the drivers on the path mentioned above (c:\android-sdk\extras\google\usb_driver).
  14. Now, on your computer open command prompt: “start -> run -> type cmd”.
  15. On the cmd window enter the following commands (one at a time): cd C:\android-sdk\platform-tools; fastboot.exe -i 0x0fce getvar version; fastboot.exe -i 0x0fce oem unlock 0xKEY (replace key with the code obtained before).
  16. That’s all, now the bootloader will be unlocked.
  17. In the end, remove the USB cable and reboot your smartphone.

Problem Faced: STEP 13  The driver to be installed was not accepted by the system.
Soln: 
Hold down the Windows key on your keyboard and press the letter C to open the Charm menu, then click the gear icon (Settings).

Click More PC Settings.

Click General.

Under Advanced Startup, click Restart Now.

NOTE: In Windows 8.1, the ‘Restart Now’ button has moved to ‘PC Setting -> Update & Recovery -> Recovery.’

After restarting, click Troubleshoot.

Click Advanced Options.

Click Windows Startup Settings.

Click Restart.

After restarting your computer a second time, choose Disable driver signature enforcement from the list by typing the number 7 on your keyboard.

Your computer will restart automatically.

After restarting, you will be able to install the  drivers normally; however, Windows will display a warning message. When the warning appears, click Install this driver software anyway

Soln from:  https://learn.sparkfun.com/tutorials/disabling-driver-signature-on-windows-8/disabling-signed-driver-enforcement-on-windows-8

So after unlocking your bootLoader.

PART 3:

Download from here
AVD Rom Latest Release

Addon Archive

Kernel ftf

FIXES_FOR_AVD_1.6_V.zip


place Rom & Addon zip on externel sdcard


Place the downloaded file ClockworkMod-6.0.2.5.img into the folder  C:\android-sdk\platform-tools

Instructions:
  • Download ClockworkMod from the link above
  • Switch off phone
  • Hold Vol-UP button
  • Insert USB cable, wait for blue light
On the cmd window enter the following commands (one at a time): cd C:\android-sdk\platform-tools
type:
run fastboot flash boot ClockworkMod-6.0.2.5.img

and then type
run fastboot reboot

  • when the purple LED shines, press and hold the Vol-UP button
You are now in ClockworkMod Recovery!

Wipe data/factory reset, wipe cache partiton, go to advanced wipe dalvik cache. then go to mounts & storage format system.

Go to install zip from sdcard choose zip from externel sdcard. flash rom

when installation is finished go back to advanced choose fix permissions


PART 4:

Now we need to download and install flashtool 
After installing it. 

The Kernel ftf  that you downloaded
"st26i_11.2.A.0.31 Kernel By Gavster26@XDA_Central Europe.ftf" needs to be extracted. 
You need to have 7Zip or any other file extracting programs.
Once you are done extracting you will find a file called kernel.sin 

follow the instructions in the video
Note: u need to browse for the kernel.sin file that you extracted.


Note:Be careful while browsing and selecting the right file, I happened to choose the wrong one and my phone would not startUp but I retried with the right file and it worked.
Now Flashing of new kernel is done.

PART 5:

Next for Addon Package: It is the same as the instructions in part 3. 
Except that here we select the addon package zip from sd card 
After that follow PART 4 (Flash the kernel again)

PART 6:
The file you downloaded FIXES_FOR_AVD_1.6_V.zip extract it and place the files on sd card.

Download Root Browser place it on ur phone SD card.

Start your phone and install the RootBrowser APK that you downloaded.

Now open it up and copy systemui.apk from the extracted files of FIXES_FOR_AVD_1.6_V.zip to /system/app give permissions rw-r-r
Note: there will already be a copy of systemui.apk rename it to sytemui_copy.apk and then push/copy the file. Tap and hold on the file for long and select permissions from the menu and give it as rw-r-r

Similarly copy  framework.jar to system/framework give permissions rw-r-r
Note: there will already be a copy of framework.jar rename it to framework.jar_copy.apk and then push/copy the file. Tap and hold on the file for long and select permissions from the menu and give it as rw-r-r

You are done.
Be careful while flashing/rooting/unlocking as the methods vary from each model.
Refer XDA forums when in doubt.


Sunday, August 31, 2014

Top 5 reasons to root your Android device


1. Increase Internal memory
2. Fix any broken button
3. Better ROMS
4. Better Looks
5. Performance

If you have an Android phone and in need of any of the above for your phone. Then you need to root your android phone.

Rooting is a means of unlocking the device's capability allowing the user to have complete control.
Rooting method is different for different phone. Lookit up well before you proceed.
For more info: www.xda-developers.com/

Saturday, January 21, 2012

Cam Scanner -Doc scanner for ur android device

u can use this amazing free software to change the quality of ur pictures of documents to real SCAN quality i.e the one with good clarity. Don't miss out on this one cause this is one hell of a APP! Will upload a sample soon!
https://market.android.com/details?id=com.intsig.camscanner&hl=en


Wednesday, January 4, 2012

Google Googgles -OCR for mobile

so far the best in the market, can read the characters of an image (ocr-optical charac recog)  Identifies products, famous landmarks, storefronts, artwork, and popular images found online. 
GET IT NOW!

Thursday, December 29, 2011

Advanced Task Killer

Got an android phone? Is it slowing down frequently unless u restart it everytime??
It happens cause most of the processes are not killed after the use of a particular app.


Use ADVANCED TASK KILLER free version
Add a shortcut of it on the main screen & tap on it once in a while. It automatically kills the processes.
Displays something like this : 2 apps killed 148 mb memory available.

DOWNLOAD

Not advisable for Android Version 4.4 and above

Saturday, May 16, 2009

MyPhoneExplorer


Simply explore your Sony Ericsson phone !

Connect your phone via cable, bluetooth or infrared and you'll be surprised how easy and efficient you can manage your phone with this compact software. Since it's first appearance MyPhoneExplorer evolved into the most popular freeware tool for SE-phones and is constantly extended by new features.

Features:

* Adressbook - with direct sync to Outlook, Windows contacts, Thunderbird, GMail, Lotus Notes and Tobit David
* Organizer with calendarview and direct sync to Outlook, Sunbird, Thunderbird, Windows calendar(Vista), Rainlendar, Lotus Notes, Google, Tobit David and net shared calendars (WebDAV, FTP, local)
* SMS - archive, export, import, excessive messages,...
* Filebrowser with cachesystem to minimize datatransfer, automatic photosync...
* Set phoneclock based on atomtime
* and much more. f.e.: calllists, edit profiles, control phone, memorystatus, phonemonitor,...

MyPhoneExplorer is basicly compatible with all Phones from SonyEricsson except P800i, P900i and P910i. Besides this there exists a few Low-Cost-Phones (f.e. T200i) which does not have a PC-Interface. If you are using a Symbian-Phone from SE please note: Its needed to install the PC-Suite first and the connection with MyPhoneExplorer is only possible throught USB-Cable.

Backup your Sony Ericsson phone 's contacts, sms etc to ur pc

Download